

The code for this article is on GitHub: https://github.com/Vaultspeed/generic-fmc-integrations/tree/main/snowflake_tasks
In Part 1 of this article, I provided an example of the SQL objects you can use to deploy a Generic FMC workflow to Snowflake in the form of a Snowflake task DAG. This is a convenient option if you want to run all three code artifacts that VaultSpeed generates (DDL, ETL, and FMC) on a single platform like Snowflake. However, we still needed to cover automatic deployment to complete the automated steps, and that's what I'm doing here.
NOTE: This example does not yet handle Object-specific loading window. You must use standard batch loading with parameter OBJECT_SPECIFIC_LOADING_WINDOW = N in VaultSpeed.
This article assumes you have set up your VaultSpeed agent, and it is able to connect to your Snowflake account and has privileges to run DDL scripts. Here are the steps;
In your agent environment, install:
- SnowSQL (Snowflake SQL API) https://docs.snowflake.com/en/user-guide/snowsql-install-config
- jq (JSON tool for command line) https://jqlang.github.io/jq/download/
Copy the bash deployment script, "snowsql_deploy.sh", to your agent folder. This shell script unzips the FMC files, extracts properties about the DAG name and schedule interval from the "info" JSON, formats the "mappings" JSON, inserts "mappings" JSON into the Snowflake work table, and calls the CREATE_VS_FMC procedure to build the Snowflake task DAG.
#!/bin/bash
set -e

##################################################
## Variables - change these for you environment ##
##################################################

snowsql_conn=bryan
snowflake_warehouse=VAULTSPEED
task_schema=TASKER
default_schedule="USING CRON 0 0 1 1 * America/New_York" ## Here, 01 January at midnight is the default when no schedule is available in the FMC definition
agent_folder=/home/vsstudent/agent
zipname=$1

## Set file and directory paths
path_to_generated_files=`cat $agent_folder/client.properties | grep ^path.in | cut -d '=' -f 2`
# Check if the zipfile is there
if ! [ -f $path_to_generated_files/$zipname ]; then
    echo "cannot find file $path_to_generated_files/$zipname"
    echo "exiting script"
    exit 0
fi

## Get basename of zipfile (= remove everything after the first '.'), this will be used as the foldername to unzip the files in
dirname=$path_to_generated_files/${zipname%%.*}

## determine name of logfile
## logfile=$dirname"_deploy.log"
## echo "name of logfile: $logfile"

unzip -q -u $path_to_generated_files/$zipname -d $dirname

## Clean up the mapping file--remove backslash escape
fmc_json_mapping=$(cat $path_to_generated_files/${zipname%%.*}/*mappings*.json)
bkslshstr='\\"'
fmc_json_mapping=${fmc_json_mapping//$bkslshstr/}

## Truncate table that stores JSON mapping
snowsql -c $snowsql_conn -o exit_on_error=true -q "TRUNCATE TASKER.TASK_MAPPING;"

## Insert JSON mapping into task mapping table; use as work table for task generation procedure
snowsql -c $snowsql_conn -o exit_on_error=true -q "INSERT INTO TASKER.TASK_MAPPING (JSON_MAPPING) SELECT TO_VARIANT(PARSE_JSON('$fmc_json_mapping'));"

## Remove VaultSpeed ASCII header from info JSON
fmc_json_text=$(cat $path_to_generated_files/${zipname%%.*}/*FMC_info*.json)
dv_find_str='"dv_code"':
pos=$(awk -v a="$fmc_json_text" -v b="$dv_find_str" 'BEGIN{print index(a,b)}')
fmc_json_text={"${fmc_json_text:$pos+33}"

## Get DAG name, schedule interval, group tasks setting, and target database type from info JSON
dag_name=$(echo $fmc_json_text|jq -r '.dag_name')
schedule_interval=$(echo $fmc_json_text|jq -r '.schedule_interval')
group_tasks=$(echo $fmc_json_text|jq -r '.group_tasks')
dv_database_type=$(echo $fmc_json_text|jq -r '.dv_database_type')

##Check for Grouped tasks
if [ "$group_tasks" == "true" ]
then
    echo "Group tasks must be set to 'false' for Snowflake Tasks deployed with generic FMC." >&2
    exit 1
fi

##Check target database type
if [ "$dv_database_type" != "SNOWFLAKE" ]
then
    echo "The data vault database type must 'Snowflake' for Snowflake Tasks deployed with generic FMC." >&2
    exit 2
fi

##Add a default schedule if no value is available in schedule_interval (required for Snowflake Tasks)
if [ "$schedule_interval" == "" ]
then
    schedule_interval=$default_schedule
fi

## Execute procedure to generate tasks/dag
snowsql -c $snowsql_conn -o exit_on_error=true -q "CALL TASKER.CREATE_VS_FMC('$snowflake_warehouse', '$task_schema', '$dag_name', '$schedule_interval');"


exit 0
In the agent's client.properties file, set the path of the deploy.cmd parameter to the path for snowsql_deploy.sh. This line tells the VaultSpeed agent where to find the deployment script when you call it from the app.
deploy.cmd = sh /home/agent/snowsql_deploy.sh {zipname}Restart the VaultSpeed agent for the new settings to take effect.
In the SnowSQL config file (~/.snowsql/config), name the connection to your target database and set the connection properties to be used by the SnowSQL API. You can use your preferred authentication method. This example uses USERNAME and PASSWORD authentication:
[connections.{your_connection_name}]
#Can be used in SnowSql as #connect example

accountname = {your_account}.{your_region}.{your_cloud}
username = {your_username}
password = {your_password}
warehousename = {your_warehouse}
dbname = {your_db}
Open the "snowsql_deploy.sh" shell script and change the variable values to match your environment:
snowsql_conn= {your_connection_name}         ## target db connection name in SnowSQL config file
snowflake_warehouse= {your_warehouse}         ## target warehouse name in SnowSQL config file
task_schema= {your_Snowflake_task_schema}     ## schema with task objects
default_schedule= "{your_default_schedule}"  ## default schedule interval when none is supplied in info JSON
agent_folder= {your_agent_folder_path}       ## folder where vs_agent.jar runs
Run the script "SF_DAG_DEPLOY_OBJECTS.sql" in your target Snowflake database. This should create 6 SQL objects (including the TASKER schema. (If you already did this in Part 1, skip it.):
1 schema, 1 sequence object, 1 table, and 3 stored procedures
In VaultSpeed, set up a Data Vault with FMC_TYPE = generic and ETL Generation type = Snowflake SQL.
Generate the DDL and ETL for your Data Vault and deploy both to the target database.
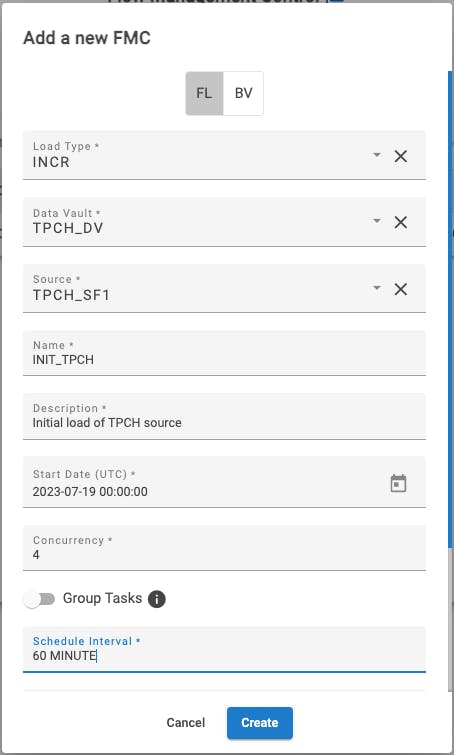
Generate the FMC workflows. Be sure to use a valid schedule interval provided in the Snowflake Tasks documentation. Do NOT enclose the schedule interval value in double quotes (") or single quotes ('). Make sure Group Tasks is toggled off. VaultSpeed will require a numeric Concurrency value, but it will not impact the workflow.
Go to the Automatic Deployment screen in your VaultSpeed subscription. Select the generic FMC generation you wish to deploy and click the up arrow to deploy it. Select the Custom Script option and click Deploy.
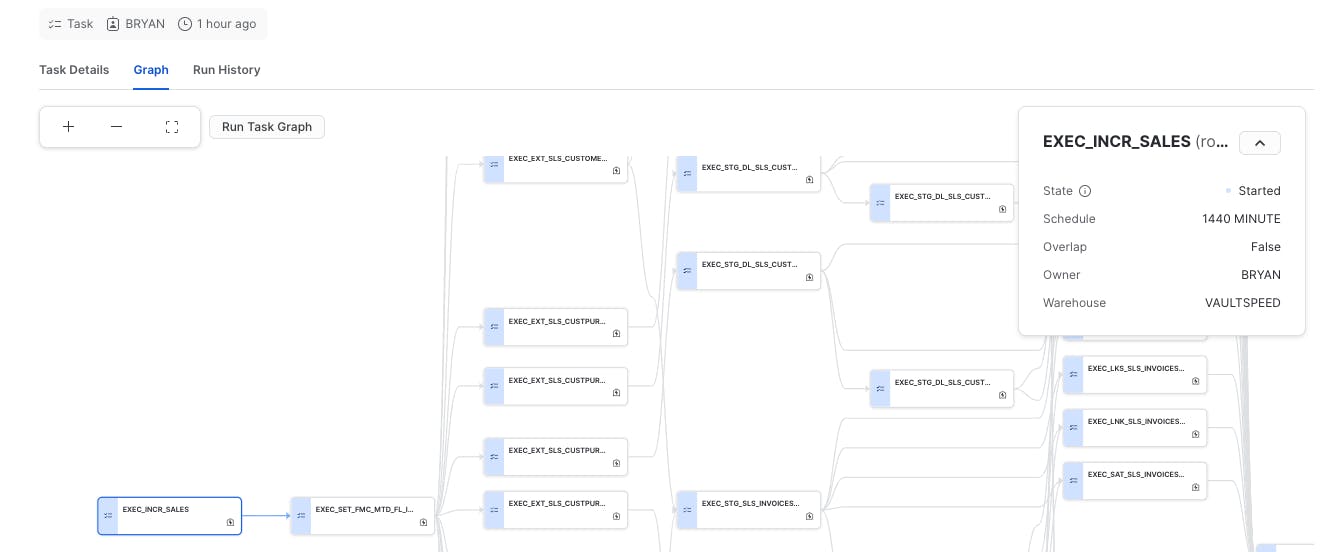
If all the pieces are in place, you should see your task DAG under tasks in the TASKER schema. The root task should be named "EXEC_{your_dag_name}."